
At 1,818m, Pico do Arieiro is regularly above the clouds. From the car park, you look out across a white sea of cloud punctuated by volcanic peaks — and somewhere beyond those clouds is the rest of the island, the ocean, the rest of the world. The trail that connects Arieiro to Pico Ruivo (Madeira's highest summit at 1,862m) is not technically difficult, but it is demanding, spectacular, and absolutely unforgettable. This is the hike that defines what it means to walk in Madeira.
💡 Tip: Quick Answer: The Pico do Arieiro hike (PR1) is a 7km one-way trail from Madeira's 3rd-highest to highest peak. It takes 3.5–5 hours, involves long tunnels, steep steps, and exposed ridges. Bring a headlamp, hiking boots, and layers. Sunrise start is strongly recommended.
**Quick Answer:** The PR1 trail from Pico do Arieiro to Pico Ruivo is **7km one-way**, takes **4–5 hours**, and is rated moderate-challenging. Start at dawn for the best light. Wear layers, bring water, and take the tunnel route if you're not confident with exposed ridges.
Table of Contents
- Trail Overview
- Trail Route Options: Tunnel Route vs Exposed Route
- The PR1 to Pico Ruivo — Section by Section
- Difficulty & Fitness Requirements
- Getting There
- What to Bring
- Sunrise Tips
- FAQ
Pico do Arieiro Hike: Trail Overview
- Trail name: PR1 Vereda do Areeiro
- Distance: 7km one way (14km return)
- Start: Pico do Arieiro car park (1,818m)
- End: Achadas do Teixeira (1,560m) or Pico Ruivo summit (1,862m)
- Cumulative elevation: ~1,000m gain and loss
- Time: 3.5–5 hours one way, 6–9 hours return
- Difficulty: Challenging
- Headlamp: Mandatory
- Best season: April–October
The PR1 is Madeira's most famous trail — the only route that traverses the island's central mountain ridge from Pico do Arieiro to Pico Ruivo across the volcanic high ground. Most hikers do it one-way, starting at Arieiro (where there's road access and a car park) and finishing at Achadas do Teixeira near Pico Ruivo, where a taxi or pre-arranged pickup waits.
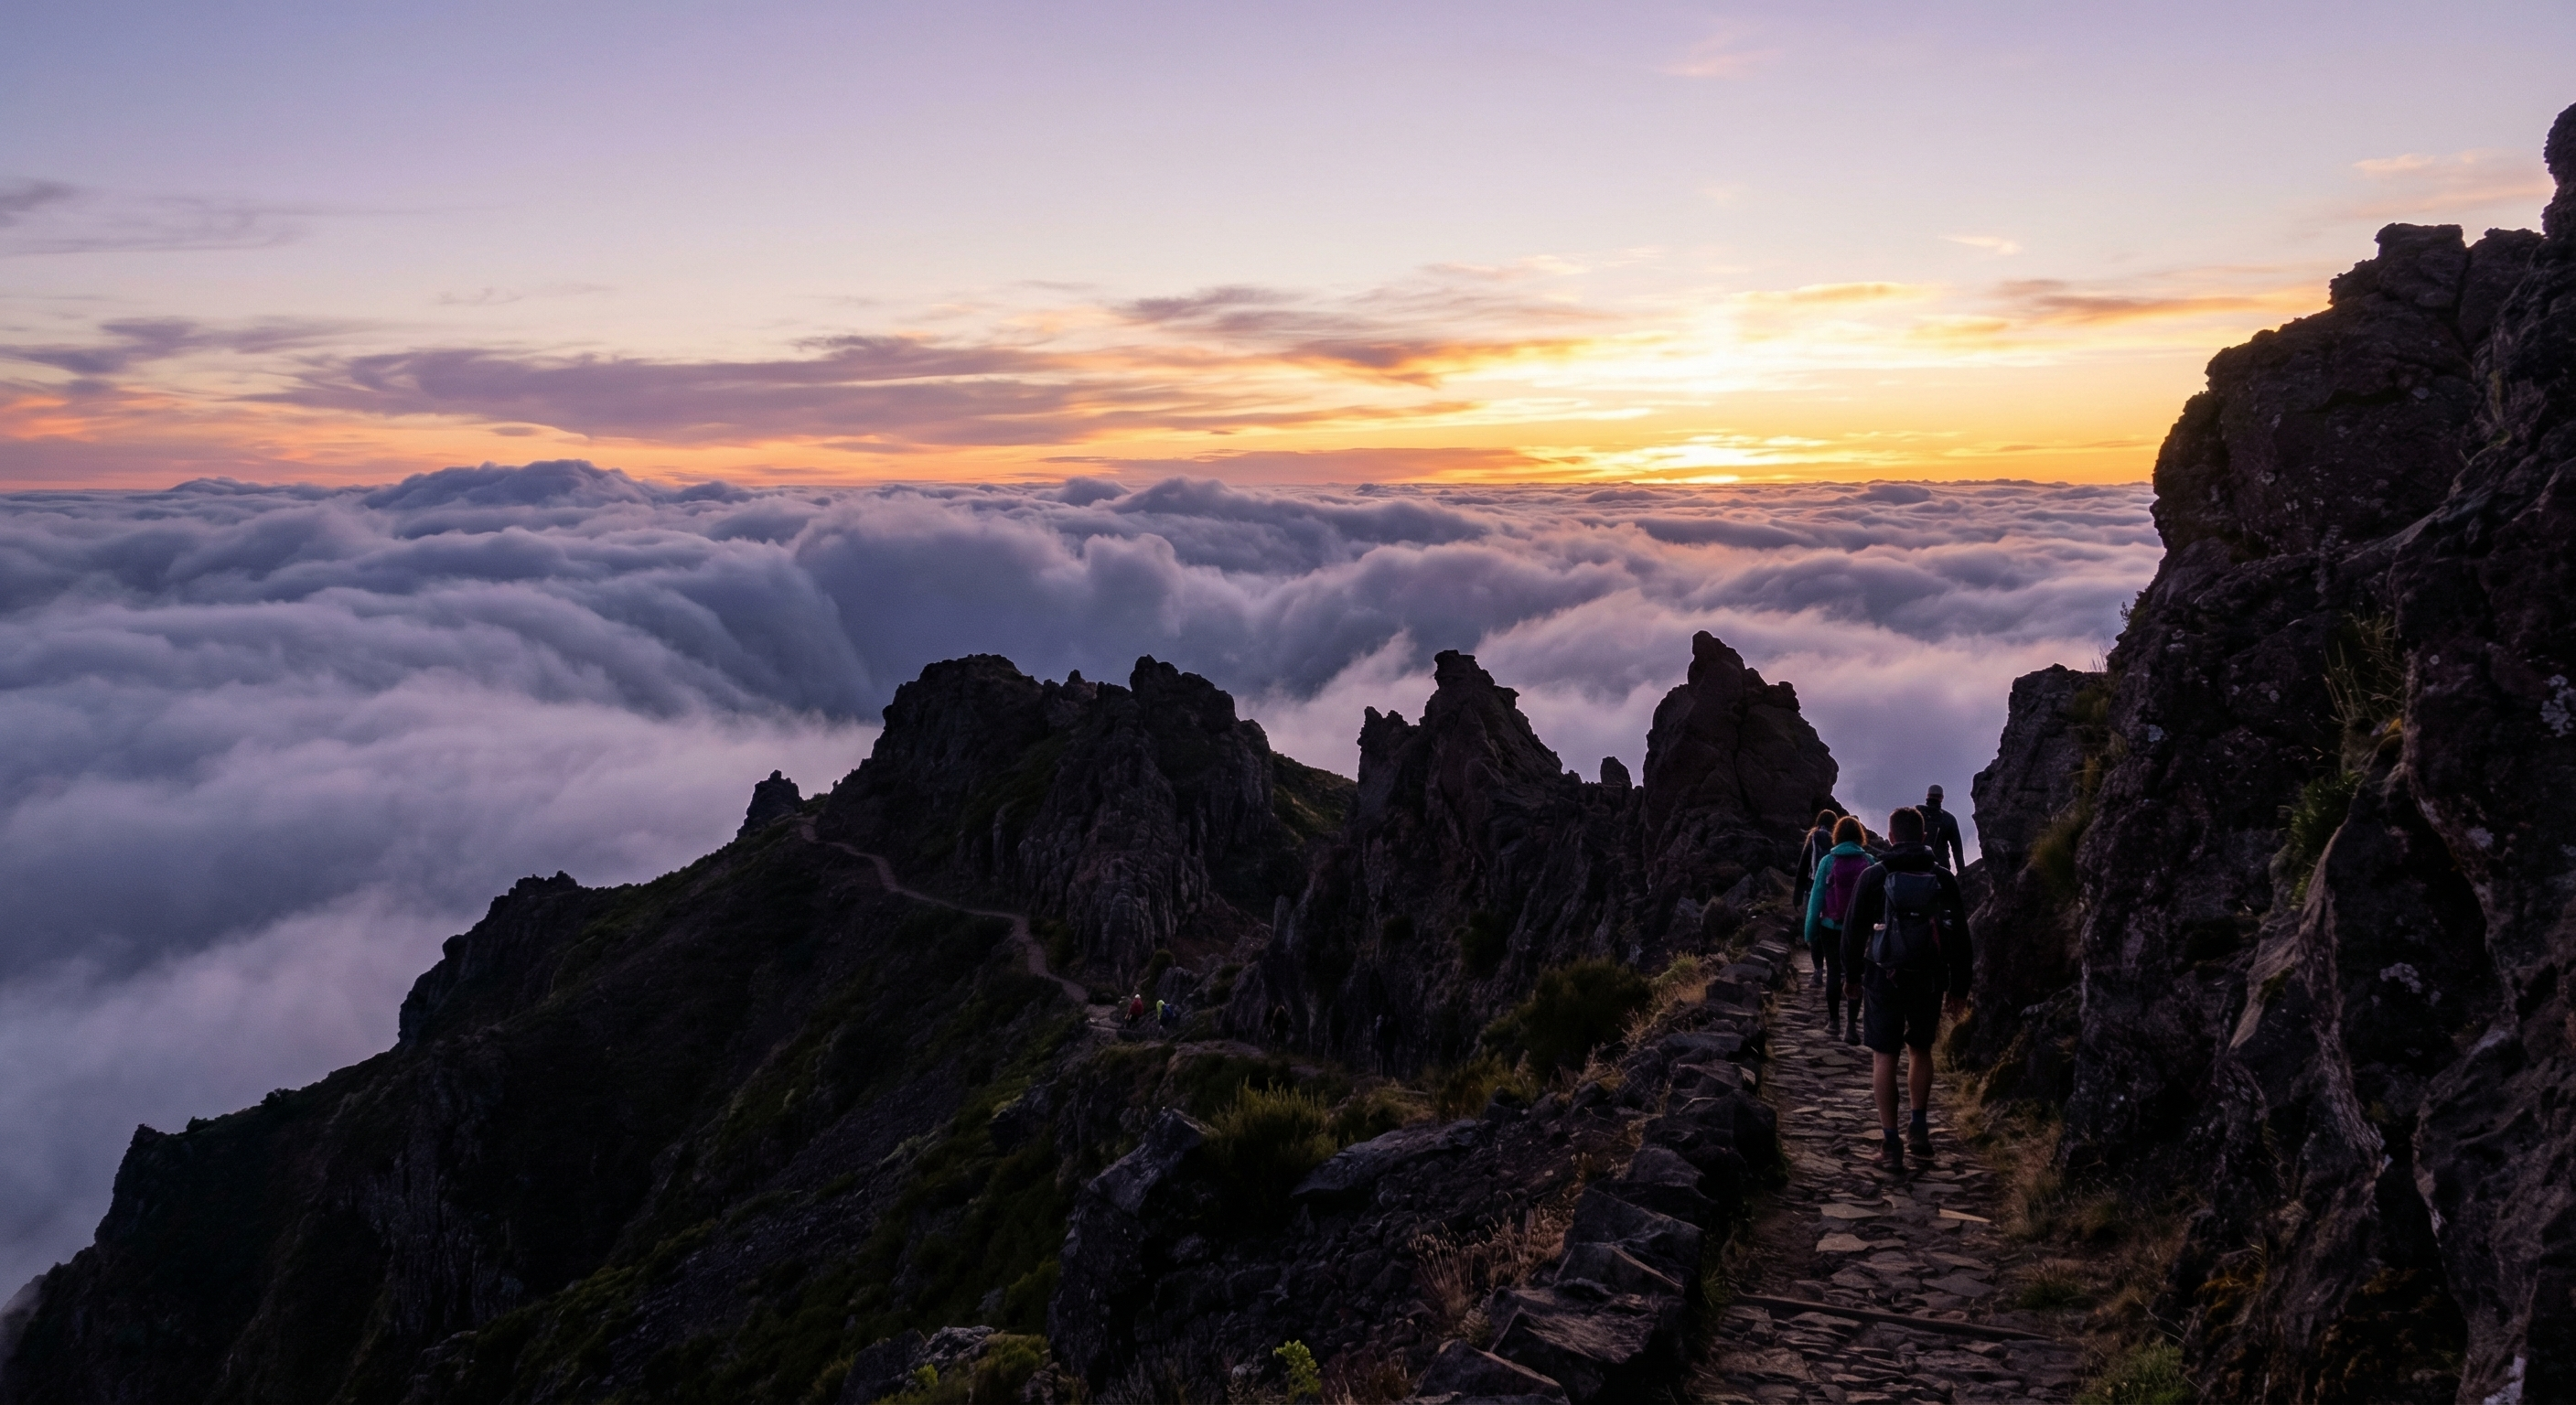
The PR1 is Madeira's most dramatic trail — a ridge walk that crosses three major peaks above the cloud layer, passing through hand-carved mountain tunnels and along paths with 300-metre drops on either side. The reward is views that stretch to every horizon. Start at dawn.
Trail Route Options: Tunnel Route vs Exposed Route
There are two main variants of the PR1 — the tunnel route (oficial) and the exposed route (via Pico das Torres). Understanding the difference is essential to planning your hike.
The Tunnel Route (Recommended for Most Hikers)
The standard PR1 route passes through several tunnels — including the main 200m+ tunnel that bypasses the most exposed section around Pico das Torres. This route is safer in bad weather, slightly shorter, and avoids the most vertigo-inducing exposed ridge section. The tunnels are completely dark inside — a headlamp is not optional, it's mandatory. Some sections inside the tunnels are low and wet, with water dripping from the ceiling.
The Exposed Route (Via Pico das Torres)
The alternative route bypasses the main tunnel and traverses the exposed ridge above Pico das Torres. This is the more dramatic option with unobstructed views in all directions — but it includes narrow ledge paths, significant drops, and safety cable sections. In good weather it is safe for confident walkers. In wind, rain, or ice it is dangerous and should not be attempted. This route adds about 45 minutes to the total time.
The PR1 to Pico Ruivo — Section by Section
Section 1: Pico do Arieiro to Ninho da Manta Viewpoint (45 min)
The trail starts with an immediate descent from the Arieiro car park on stone steps. The path is well-maintained and clearly marked. Within 10 minutes you'll reach the first dramatic viewpoint — looking back up at Arieiro and across the cloud sea below. Continue descending to the Ninho da Manta (Buzzard's Nest) viewpoint, named for the common buzzards that hunt here. This is one of the best photography spots on the trail, with a classic Arieiro ridge view.
Section 2: Ninho da Manta to the Main Tunnel (1 hour)
After Ninho da Manta, the trail becomes more demanding — a series of steep descents and ascents on rock-cut steps. You'll pass the junction for the exposed Pico das Torres route (follow the signs for the tunnel route unless you've specifically planned the alternative). This section involves the most significant elevation changes of the trail. The landscape shifts from open rocky ridges to sections of high-altitude heather and tree heath.
Section 3: Through the Tunnels (30 min)
The tunnel section is the most distinctive part of the trail. You'll pass through three to four tunnels, ranging from short (20m) to long (over 200m). Inside the longest tunnel, it's completely dark — your headlamp reaches only a few metres ahead. The tunnel floor can be wet and uneven. Cold air rushes through. Emerging into blinding sunlight at the far end is always a dramatic moment.
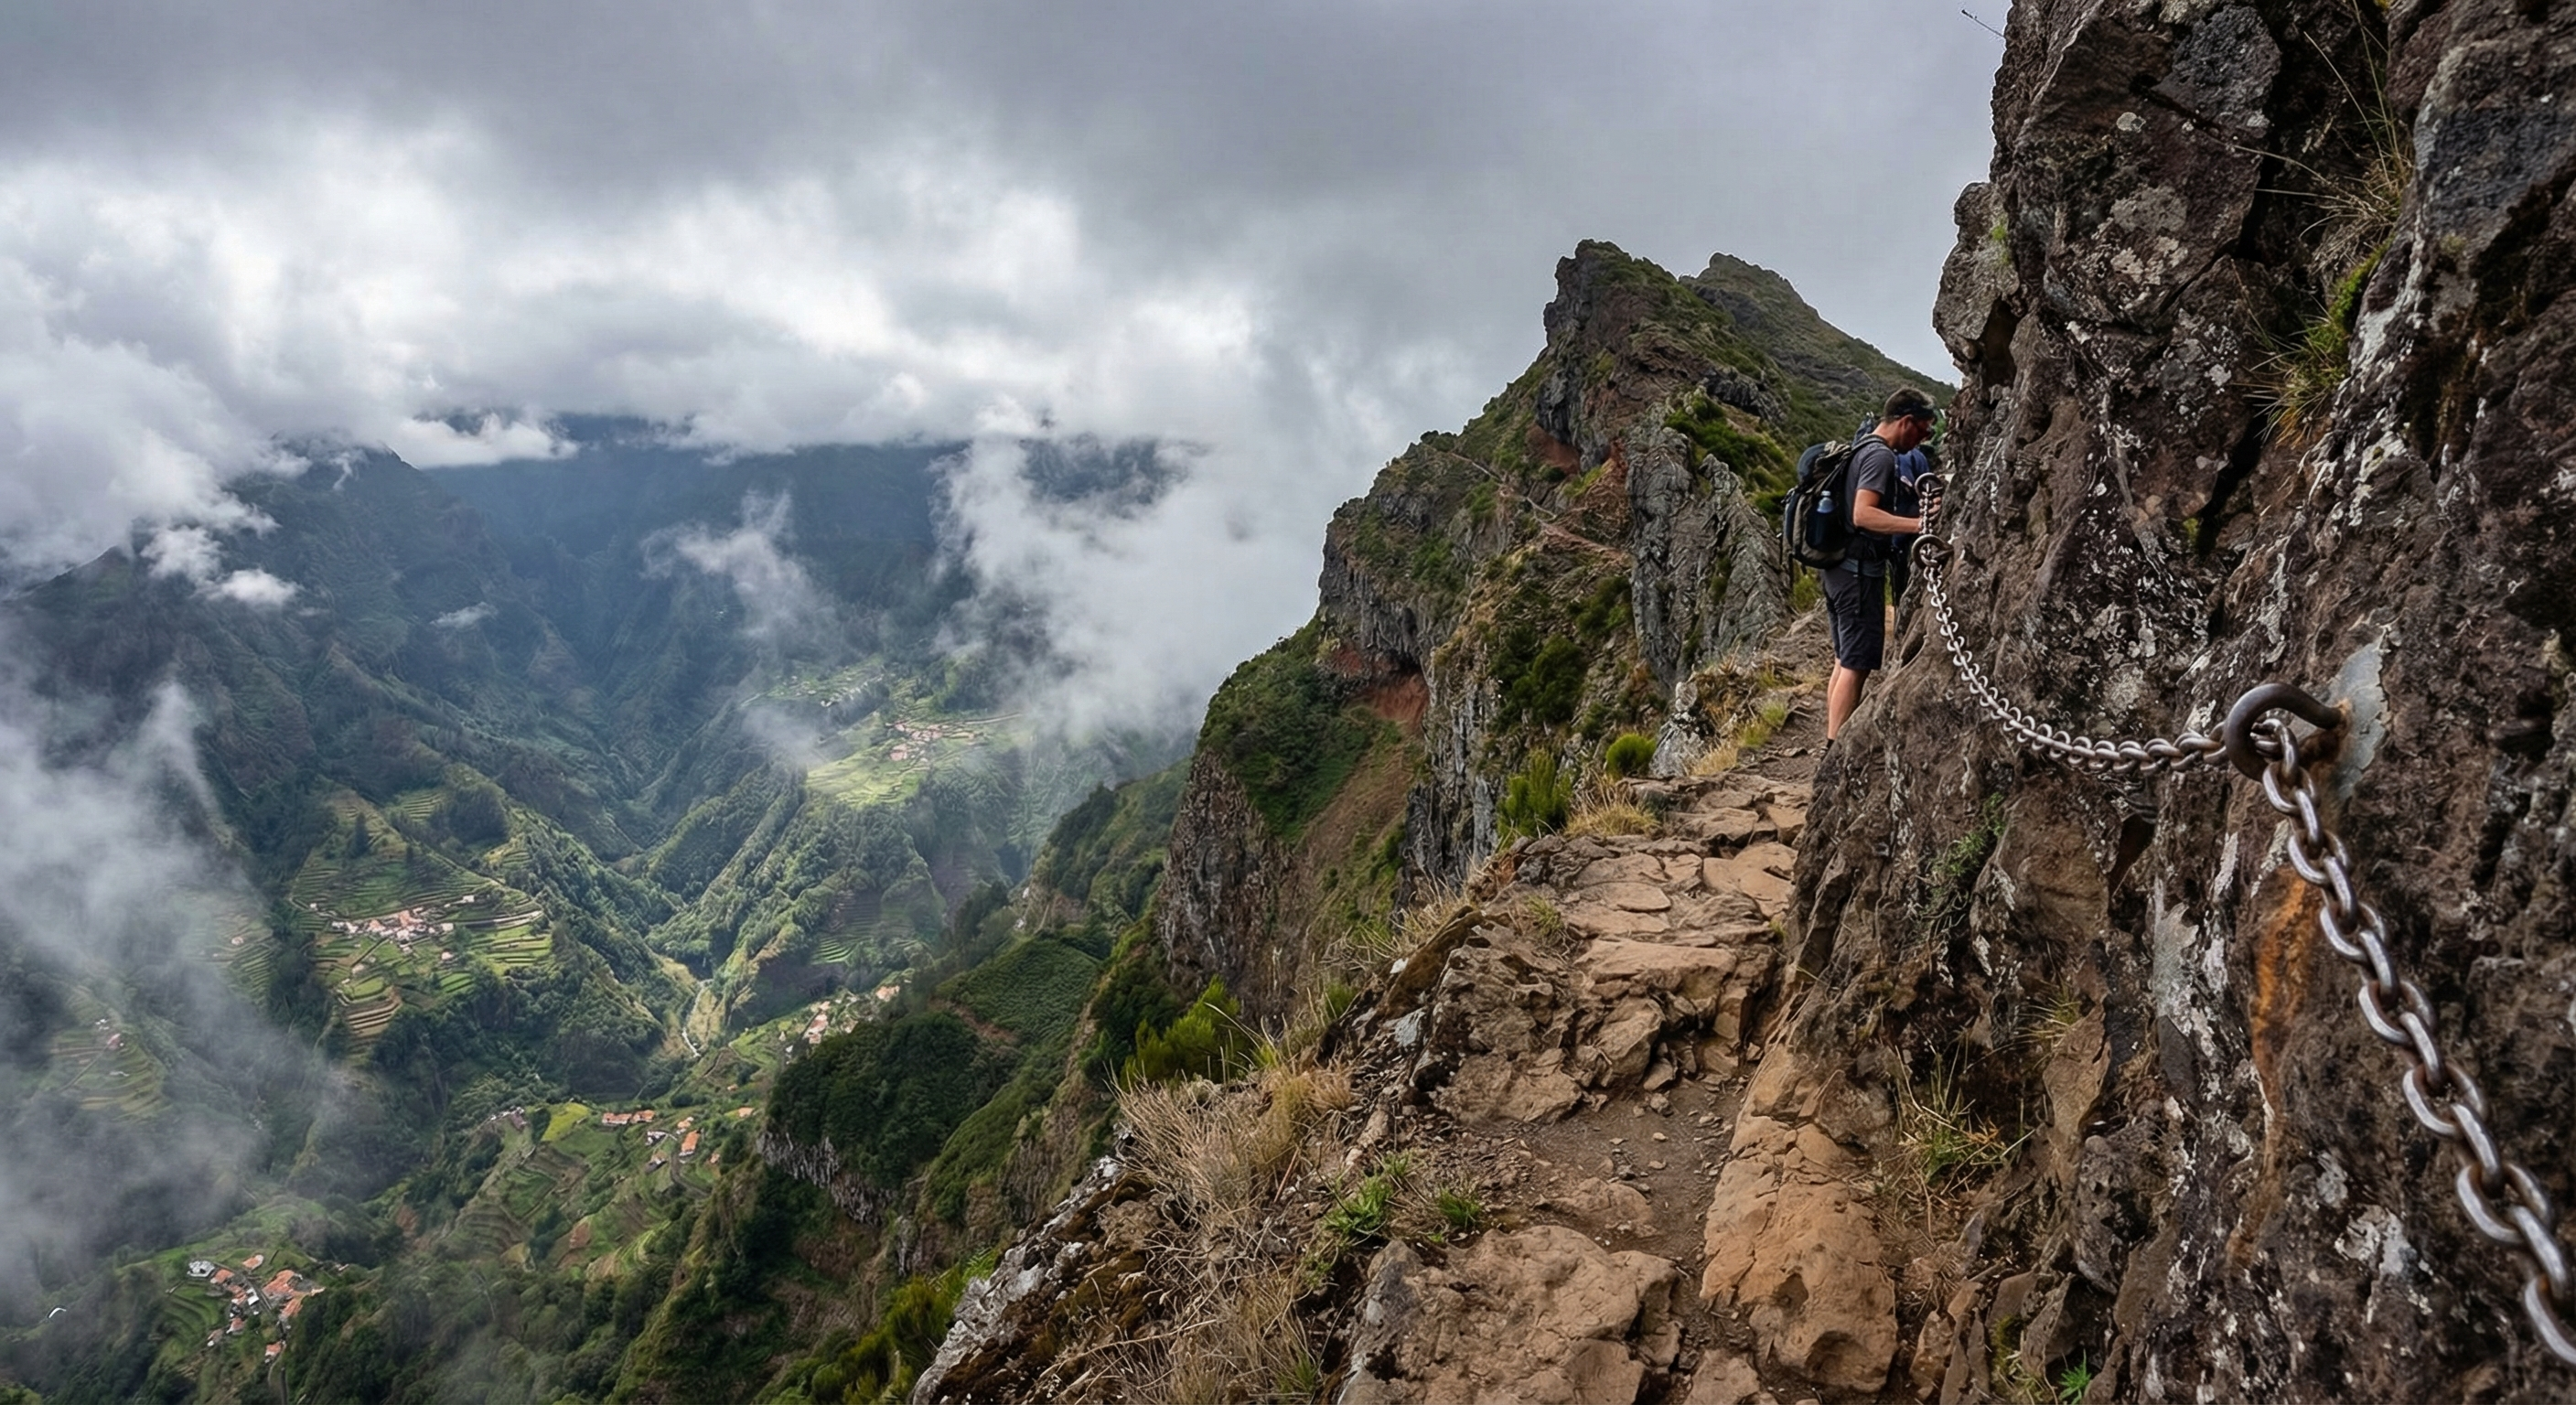
The most exposed section of the PR1 follows a narrow ridge path with chain railings bolted into the volcanic rock — a 300-metre drop on both sides. Those who are uncomfortable with heights should take the tunnel route instead. Those who aren't: this is one of the great walks of Europe.
Section 4: Tunnels to Pico Ruivo Summit (1.5–2 hours)
After the tunnels, the trail climbs steadily toward Pico Ruivo. This final section is the most sustained ascent — known colloquially as the 'stairway to heaven' for its seemingly endless stone steps climbing into the sky. The vegetation thins, the air becomes noticeably cooler, and the views back toward Arieiro across the entire ridge you've walked become extraordinary. The Pico Ruivo refuge house (with a small café when staffed) marks the final approach to the summit.
The Summit: Pico Ruivo (1,862m)
Madeira's highest point is marked by a small cairn and a meteorological station. On clear days, the view is 360 degrees across the entire island and out to sea. You can see both coastlines, all the major valleys, and often the Desertas Islands to the southeast. Allow 20–30 minutes at the summit before beginning the descent or walking down to the Achadas do Teixeira car park.
Difficulty & Fitness Requirements
The Pico do Arieiro hike is classified as challenging (vermelho/red) by the Madeira hiking authority. The main demands are:
- Sustained aerobic effort over 3.5–5 hours
- Significant cumulative ascent (~1,000m) on steep stone steps
- Exposed sections with safety cables where concentration is required
- Dark tunnel navigation
- Altitude effects: some visitors experience mild headache or fatigue at 1,800m+
The hike is achievable by any regularly active person in reasonable fitness. You don't need mountaineering experience or technical skills. What you do need is proper footwear, a headlamp, sufficient water and food, and enough time (don't rush this trail).
Getting There
By Car
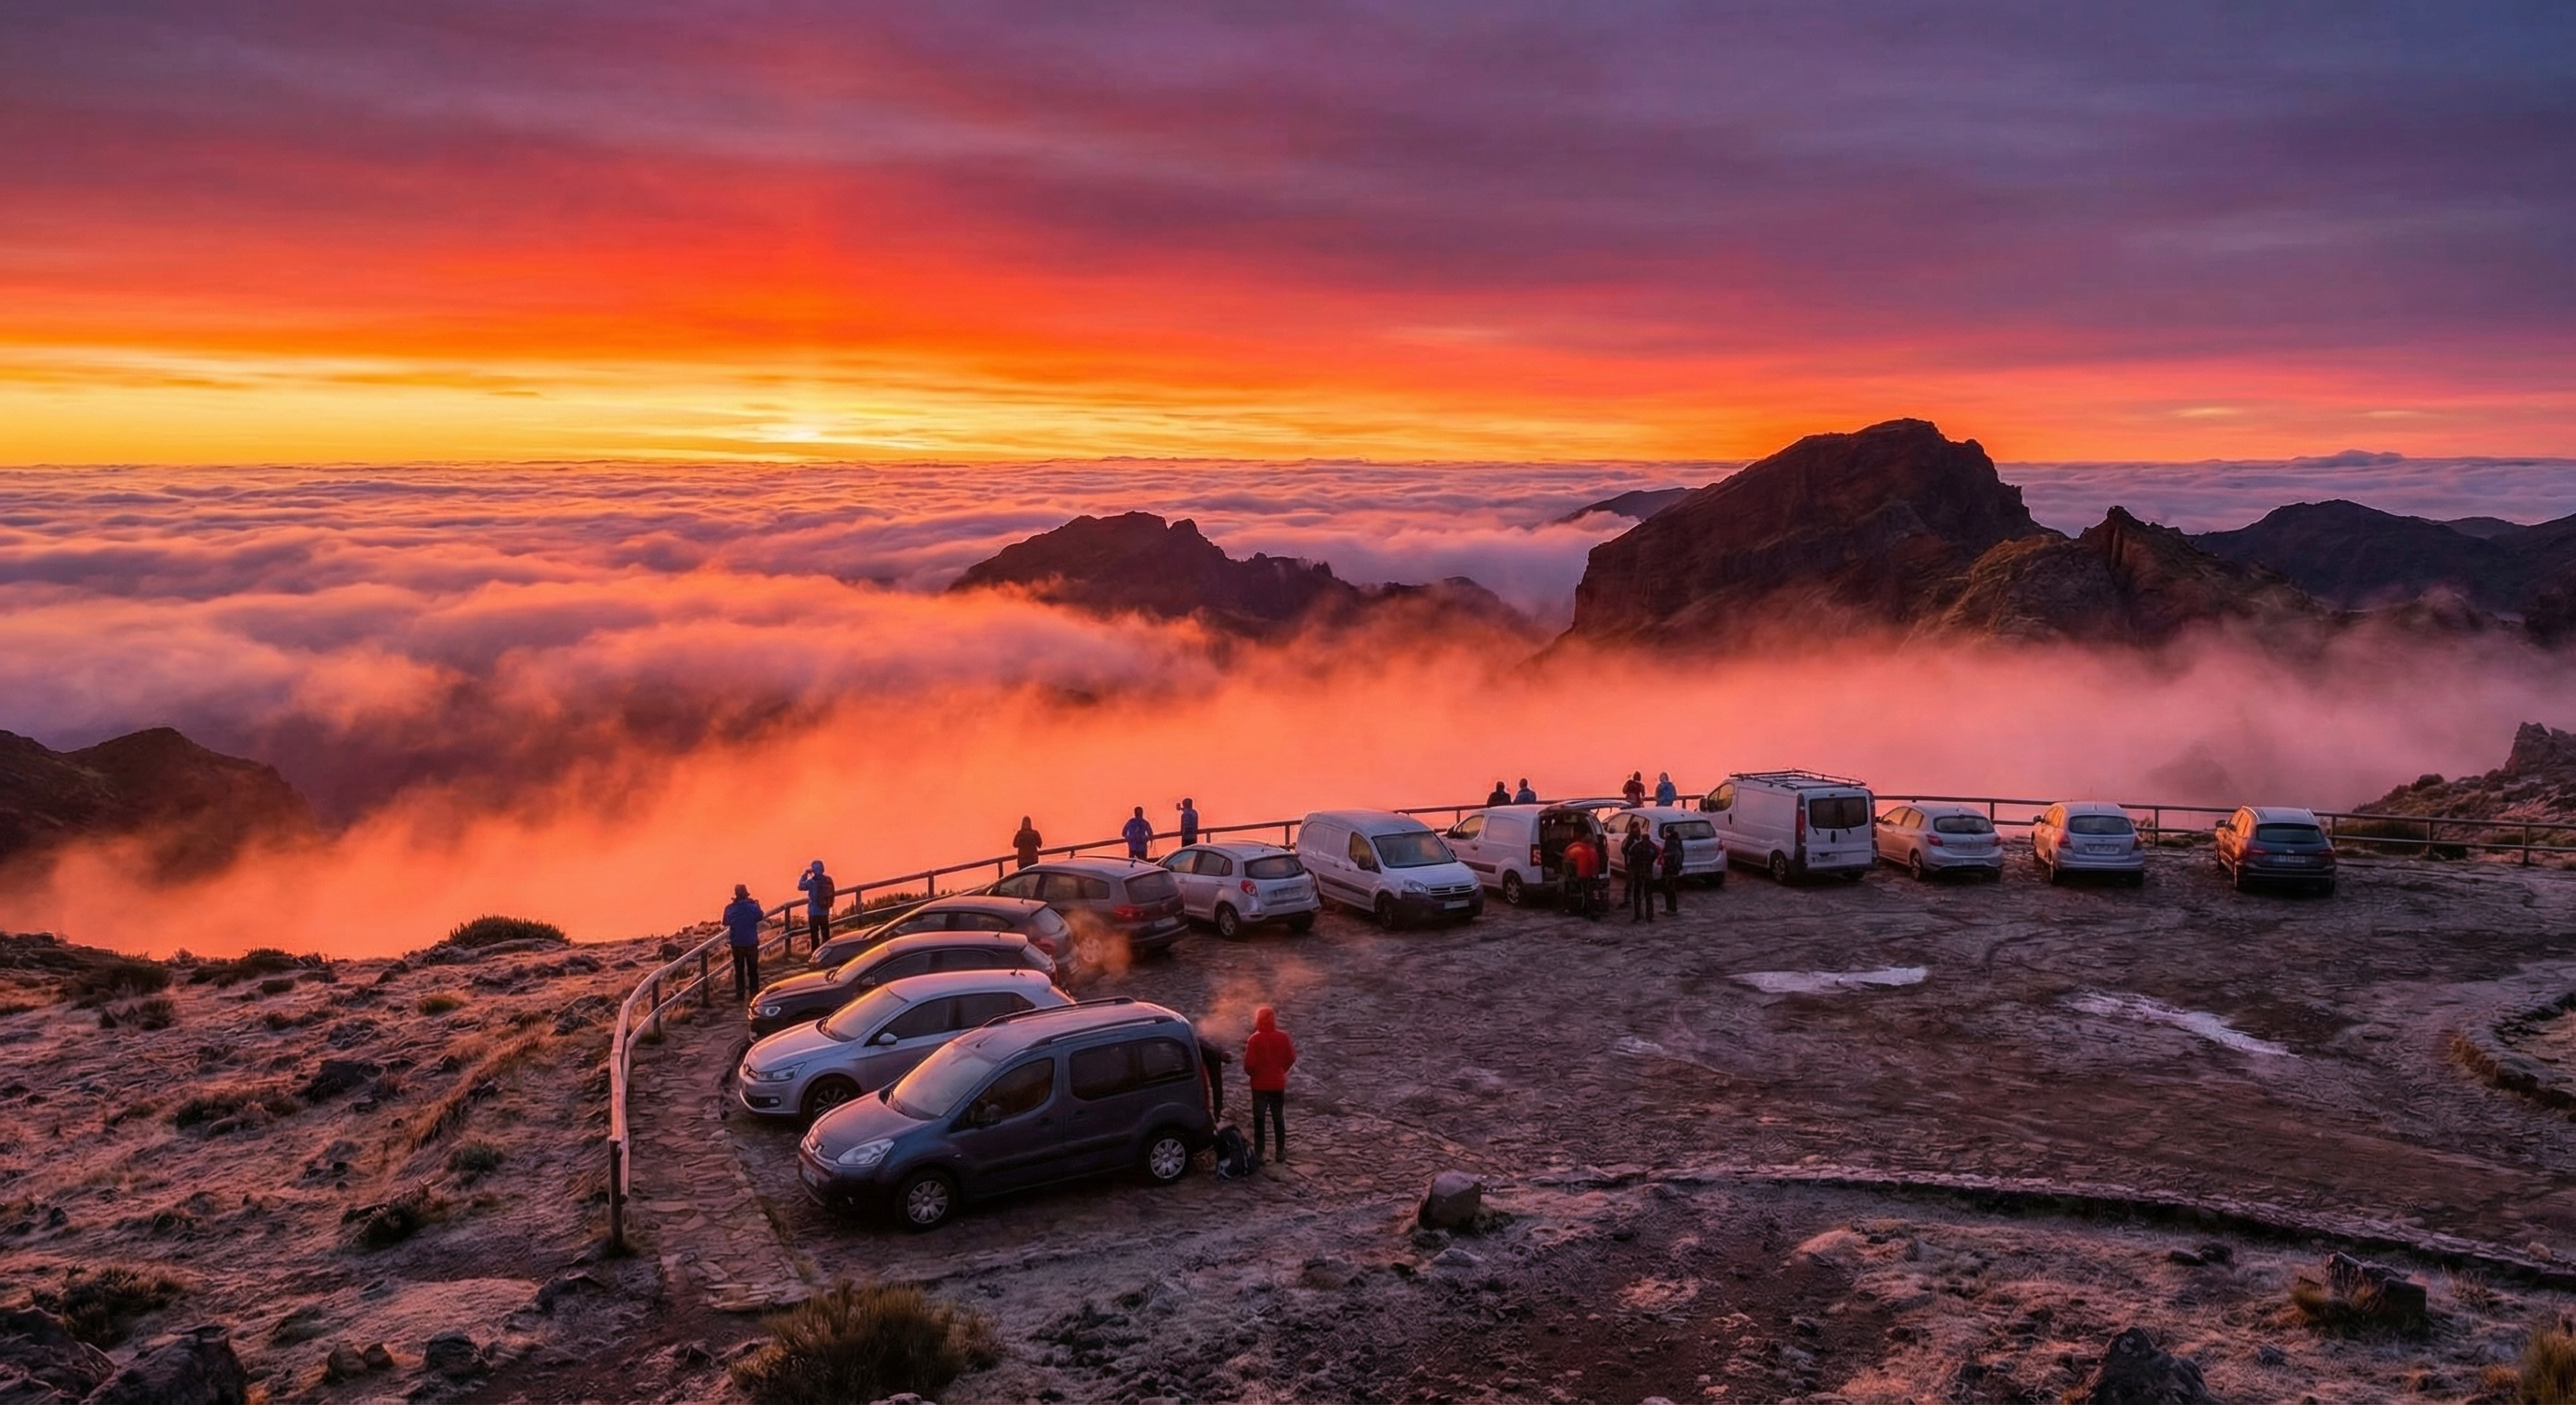
Most hikers arrive at the Pico do Arieiro car park in darkness to catch the sunrise. Bring warm layers — temperatures at 1,818 metres can be 10°C cooler than Funchal, even in summer. On a clear morning, the sight of the Atlantic catching first light from above the clouds is unlike anything else in Europe.
Drive from Funchal following signs to Pico do Arieiro — about 45 minutes on good roads. The road to the summit is paved all the way with the final section steep and winding. There's a large free car park at the summit. For sunrise hikes, arrive by 5:30–6am in summer to ensure parking.
By Organised Tour
Sunrise tours from Funchal include hotel pickup, transport to Arieiro, and a guided hike along the PR1. The guide handles the logistics (including transport from Achadas do Teixeira back to Funchal), and local knowledge adds significantly to the experience. Prices range from €45–70 per person.
Book a Pico do Arieiro Sunrise Tour
Get hotel pickup, a knowledgeable guide, and transport handled — so you can focus entirely on the trail. Browse Pico do Arieiro sunrise tours on GetYourGuide.
Browse Sunrise ToursadWhat to Bring
- Headlamp (not phone torch — the tunnels are long and you need both hands free)
- Hiking boots with ankle support and grip
- Waterproof jacket + warm mid-layer (summit temperature is 10–15°C cooler than Funchal)
- 2–3 litres of water (no refill points on the trail)
- High-energy food for 4–6 hours of hiking
- Trekking poles (highly recommended for the steep descents)
- Sun cream and sunglasses (UV is intense at altitude even when cloudy)
- Offline trail map (AllTrails or Komoot)
- Fully charged phone battery
- Emergency rain cover for your bag
Sunrise Tips for Pico do Arieiro
Sunrise at Pico do Arieiro is one of the signature experiences of Madeira travel. Here's how to do it right:
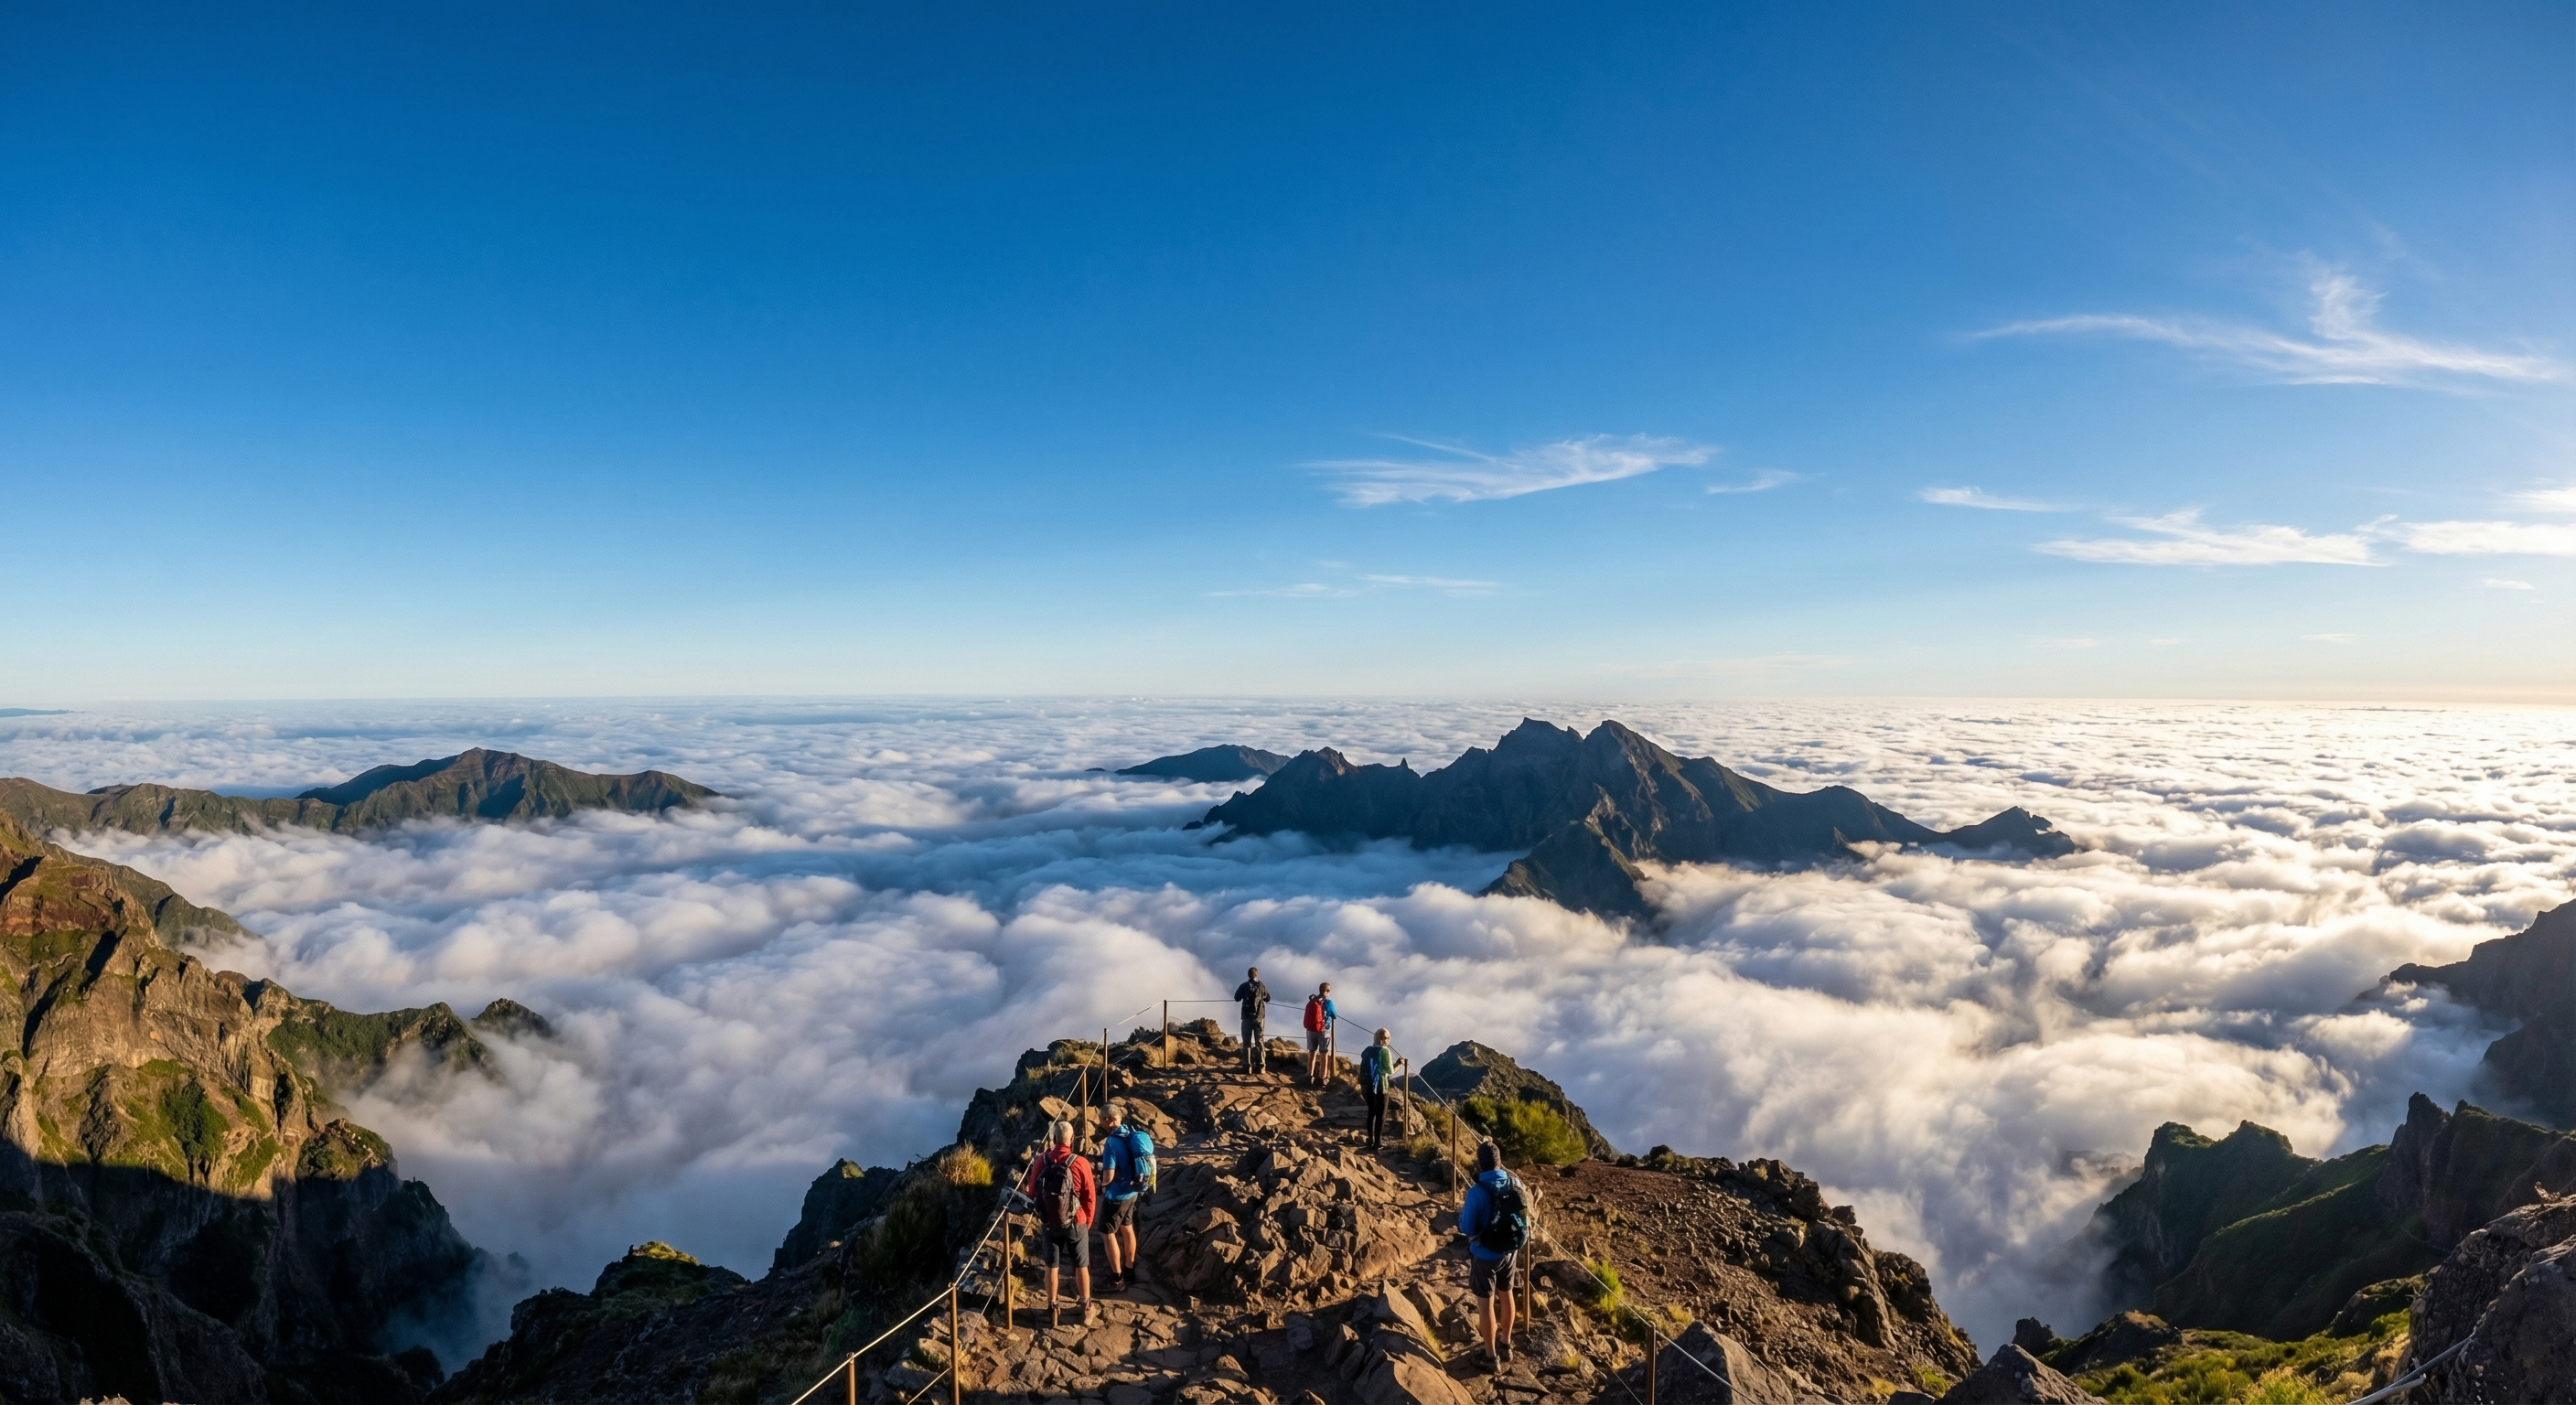
On a clear morning, the summit view from Pico do Arieiro is one of the most spectacular in Europe: multiple volcanic peaks rising from a sea of cloud, the Atlantic visible on the horizon 60km away, and — if you're early enough — the first orange light of dawn turning everything gold.
- Check the exact sunrise time for your date — in summer it can be as early as 6:05am. Drive up 30–40 minutes before sunrise
- Check cloud conditions via the Meteopt app or the Madeira webcam at Pico do Arieiro (search online) the evening before
- On clear nights, the stars from 1,818m are spectacular — arrive early and spend time looking up
- The first 30 minutes after sunrise give the best light for photography — the cloud sea below glows in orange and pink
- On cloudy mornings, the experience can still be incredible — watching the cloud move through the peaks below you, with sunlight breaking in shafts, is equally dramatic in a different way
- It can be bitterly cold before sunrise — bring all your warm layers even in summer
Drive Yourself to Pico do Arieiro
Rent a car and drive up for sunrise entirely on your own schedule. Compare the best rates for Funchal on Discovercars.
Compare Car Rentalsad

